It seems to me that we all know someone who has been affected by breast cancer these days. Co-workers, family members, neighborhood friends–it’s far too common. In those times when we hear of a loved one’s new diagnosis, we want to be helpful, do something kind and thoughtful.
That’s where the tutorial for the mastectomy pillow came in. I thought it would be a good project for those like myself who know people diagnosed with breast cancer and can sew. We did this a couple years ago for Sew Together Tuesday and since then many have reached out to say that they made one for a friend or family member.
But recently a viewer reached out to let me know that she’d made more than one mastectomy pillow. In fact, she made 52 of them!
Jennifer Roney is a breast cancer survivor and while she signed up to participate in the American Cancer Society’s Making Strides Against Breast Cancer fundraiser and walk, she wanted to do more. She bought a few yards of Cuddle® fabrics and got to work. She was able to make eight pillows out of every yard and kept going until she had made more than 50.
With each one, she printed out a note to explain her motivation, then gathered them up and brought them to St. Vincent’s Hospital in Portland, Oregon. Jennifer suggests to reach out ahead of time, as she did, to your local hospital to make sure the donations will be accepted.
I love this idea and wanted to share with you because even when you don’t have someone specific that you need to sew for, you can share your talents with strangers that do. If we all work together, we can combat breast cancer and the toll that it takes on men and women.
The #SewPink Initiative was created by ByAnnie.com LLC to raise awareness for breast cancer throughout the year. Our efforts culminate in an annual blog hop during October’s Breast Cancer Awareness Month to promote self-care, awareness, early detection and support for those affected by breast cancer. To learn more and see the calendar of events visit: https://www.ByAnnie.com/SewPINK
This year we are again joining forces with Fat Quarter Shop to promote a fundraiser. Their goal of raising $20,000 to donate to the National Breast Cancer Foundation.
Thanks for joining me for today’s stop on the SewPINK* ByAnnie blog hop ((visit the official #SewPINK information page: https://www.byannie.com/2019-SewPINK ). Like so many others, breast cancer has reared its ugly head in my life as well. Annie asked if I’d participate and I immediately agreed; raising awareness is important.
When my best friend was diagnosed with cancer at 26, it has already ravaged her body. What the doctors thought had started as breast cancer had spread throughout her body and, try as they might, there was no stopping it. Judy left an indelible mark on me, not only because of her unfailing friendship, but also her needless death.
Early diagnosis would have given Judy a chance, but as a young adult (without health insurance) the idea that the swelling could be cancer never crossed her mind. She didn’t know it was anything deadly until it was too late. I’ve learned a lot, but maybe most importantly, I learned to keep an eye on body changes, including breasts.
People want to proclaim: “Save the tatas!” and really I want to shout back: “Save lives!” That’s what regular mammograms and self-checks can do. While I want to share my little pink pincushion and favorite tools with you, I also want to remind you to keep a finger, or three, on what your breasts are doing. That means you, too, men. It affects all of us.
For my #SewPINK project I chose to make a new version of my older Circling Geese Squished Square Pincushion. I released it in early 2015 and it’s been a favorite of mine ever since. It’s a paper piecing pattern and offers three variations. But more than the pattern, I want to tell you about my favorite sewing notion: the ByAnnie stiletto.
Seriously, I sew with this stiletto in hand for almost everything, including paper piecing, bag making and sewing with Cuddle minky. For this project, the skinny little point makes it easy to guide the fabric along (and I absolutely how the metal bit has grip rather than smooth metal). It has flat sides so it won’t roll off the table and a comfortable grip that makes it feel more like a pencil than a pointy stick in your hand.
The stiletto works great for pulling out all those silly little papers that get stuck in there. I’ve found that creasing the paper and folding after sewing will help them pop out, but there are always those stubborn few that need a little extra coaxing with sharp objects.
Speaking of coaxing and sharp objects, don’t make me do it when it comes to getting yourself checked. You can find a screening near you:
(*) The #SewPink Initiative was created by ByAnnie.com LLC to raise awareness for breast cancer during October’s Breast Cancer Awareness month. They have pledged to raise funds to donate to the Breast Cancer Research Foundation through sales and to promote action through giveaways.To donate directly to the BCRF visit: https://give.bcrf.org/give/31404/#!/donation/checkout
As quilters, we are often looking for ways to make things easier, whether it’s getting perfect points or removing fold lines or keeping the bias from stretching. There are a variety of different ways of doing all of those, but today we are focusing on using sprays to accomplish it.
There are a wide variety and with the array of sewing I’ve had to do over the past few years, I’m amassed my own personal collection.
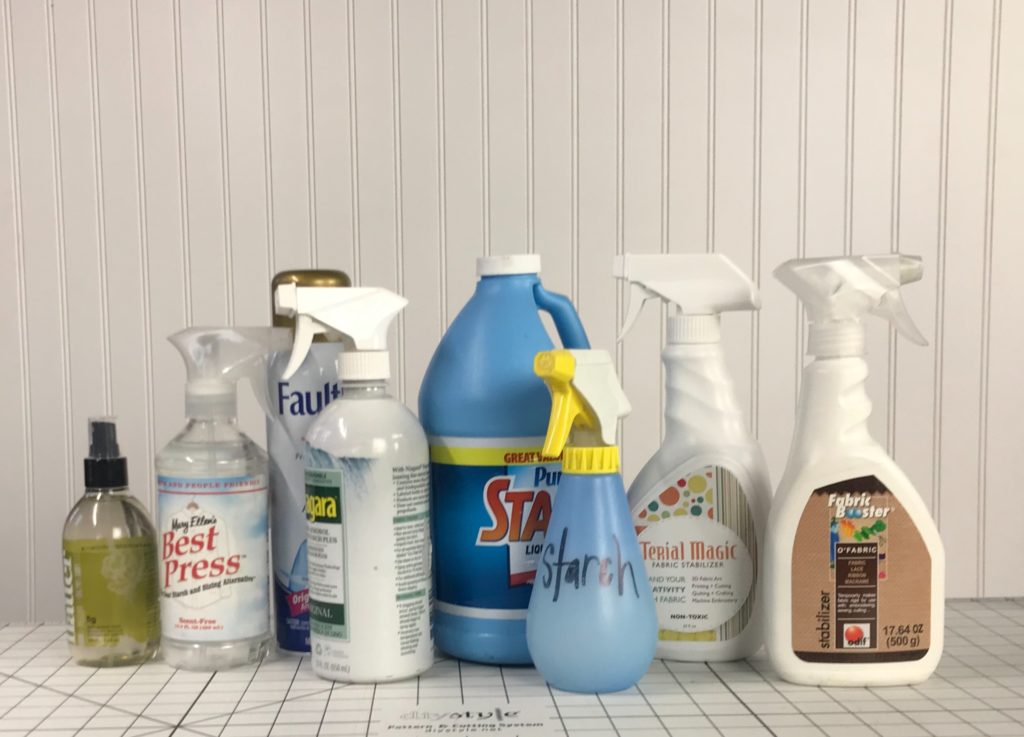
These are (most of) the starch and starch alternatives that I have, ranging from Flatter by Soak to Fabric Booster by ODIF, the sprays make for a varying level of stiffness. To give you an idea of what you might use and when, I took some squares of Robert Kaufman’s Kona Cotton and sprayed each on one side, flipped them over and pressed them. Here’s how they turned out:
Steam press
Using the steam feature of my Oliso iron, I gave this a good burst of steam to get rid of all the wrinkles and then hung it from the board. You can see the bias drape is lovely, but there’s no added stability to the fabric. I like to use the steam feature when I press my fabric after washing it and when I do a final pressing on my quilt before sending it off to the long-arm quilter. If you have an iron that likes to spit or a dry iron, simply use a little spray bottle to apply a little water first. There are misters out there that work beautifully for just this process.
Flatter by Soak
A popular staple in many modern quilters’ cupboards, Flatter is a great finishing spray. It doesn’t stiffen or stabilize the fabric; it simply loosens up the wrinkles and gives a nice finish. The pineapple and fig are my favorite scents, but is available unscented, as well. In my studio, I use Flatter on fabric that I’ve pre-washed (yes, I’m generally a pre-washer for quilting cottons) and also when I’m ironing clothing before wearing. I don’t use it when I am sewing blocks as it doesn’t have the oomph that I want from a spray. YMMV.
Mary Ellen’s Best Press
Like a starch-lite, Best Press starts giving body to fabric and has been around for years. It’s a “starch and sizing alternative” but works like one: spray it on the fabric, let it soak in for a few seconds and press. It works well for removing tough creases, in my experience, and is available unscented and in a variety of scents. It’s available in all sorts of fabric and quilt stores with sizes ranging from a 6 ounces pump spray to a gallon jug. I use Best Press most often in my quilting. I spray and press prior to cutting out my fabrics to make it a bit more precise. I’ve found that this helps avoid any stretching and makes sewing bias seams much easier. Use the spray before cutting and when pressing each seam if you really want to keep it in check. I always like to wash it out, but you don’t have to.
Niagara Non-Aerosol Spray Starch
Starch has been used to stiffen fabrics since the mid-1400s, so there’s a long (and possibly sordid) history to it. In the last decade it’s fallen out of favor with some quilters because it is a grain-based product that can be sweet to bugs when it isn’t washed out. My solution: wash your finished project. I do that anyway, but storing quilts that have been made using starch without washing first can attract moths–any textile’s sworn enemy. Starch can add a lot of body to fabrics and I tend to use it on especially lightweight fabrics such as cotton lawn and double gauze. It will stiffen it considerably, making it easy to work with fabrics that can often be a tad difficult to control. I spray the front, let it soak in then spray the wrong side of the fabric. You can spray several times to get it stiffer and it simply washes out to give the fabric its soft hand back.
Purex Sta-Flo liquid starch 2 parts water to 1 part Sta-Flo
Available only in a gallon jug, this concentrate allows you to mix with water for the perfect body/stiffness that you prefer. I mix mine so that is is fairly stiff (2:1) but you can easily water it down to a 10:1 and still get the wrinkle relaxation that you want. I like to use this when I am working with fabrics that fray or are lightweight since it makes them easier to work with and a jug will last a looooong time (I bought mine almost four years ago). Available at the local grocery store, it’s a quick and easy way to add body and washes right out in the laundry.
ODIF Fabric Booster
When you need to work with fabric that feels more like cardstock, this is the right tool for you. Fabric Booster, as well as Terial Magic, are used similarly: you soak the fabric with the spray by putting it in a plastic bag, spritzing it and then squeezing, folding, rubbing until the fabric is saturated. Allow it to air dry for a while, then you can press it dry (read the directions on the bottle!). I use a pressing cloth with it and love how stiff it makes the fabric. It’s not a replacement for Best Press or Flatter, but it works great when you are looking to really add stiffness that will then wash out. I’ve heard of it being used for t-shirt quilts and I’ve made a bunch of fabric origami with it. Otherwise, I really just want to use it for those cheesecloth ghosts my mom used to make in the 70s. It washes out in the laundry, as well.
Whether you are trying to remove wrinkles, add body or stiffen your fabric, there are multiple products that are available to help. Depending on your preference, choose the one that works best for your need. It really isn’t one size fits all here, either (which explains why I had all of these in my studio!).
Don’t forget to check out the other blog stops in our Back to School Blog Hop:
Day 1 – September 1 – Sam Hunter: Sewing Long Seams Without Stretching – huntersdesignstudio.com
Day 2 – September 2 – Susan Arnold – Joining Binding the Easy Way – quiltfabrication.com
Day 3 – September 3 – Angie Wilson – Fussy cutting tips and techniques – www.gnomeangel.com
Day 4 – September 4 – Andi Stanfield – No-Mark HST: Let your machine be your guide – truebluequilts.com/blog/
Day 5 – September 5 – Bobbie Gentili – Say YES to Y-seams – geekybobbin.com
For decades I’ve sewn in a corner of my bedroom, in the basement, in the kitchen and in the living room. But last year I inherited the big studio in our loft when Luke moved to Kansas City.
I had moved down to Los Angeles in 2016 with my sewing machine and a few boxes of fabrics and tools. Since then I’ve used a mish-mash of tables and storage found in the hall, left by Luke, or bought at IKEA. It’s been less than ideal.
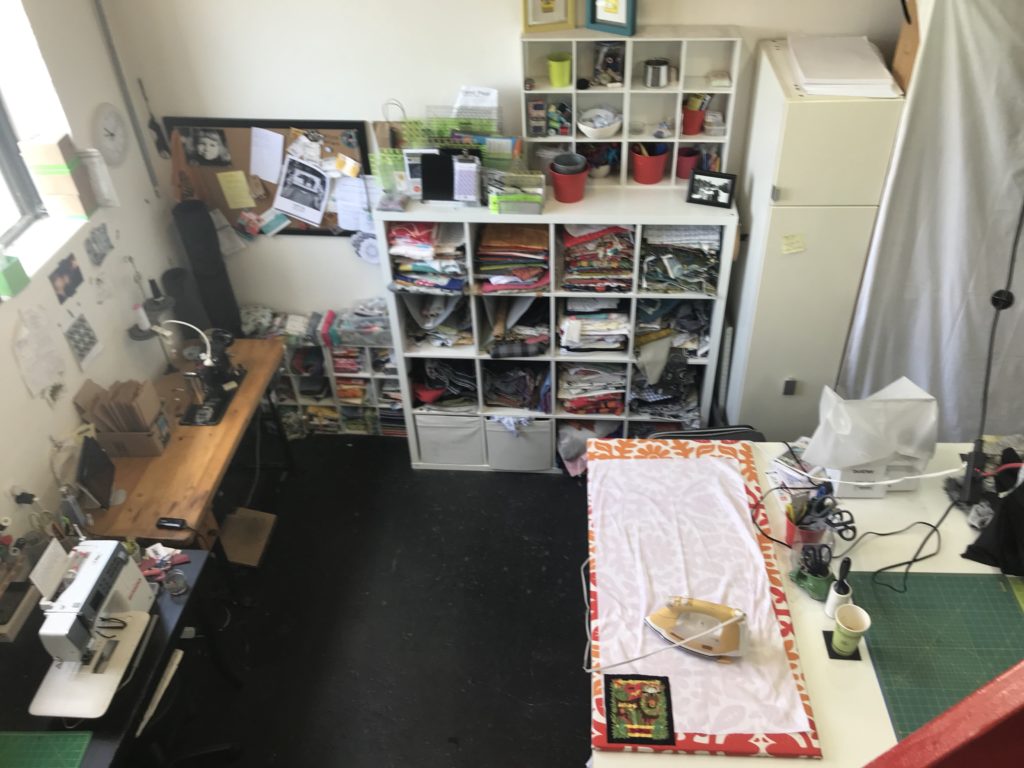
Here’s proof:
I am a crafter, sewist, and quilter so I have a big variety of fabric–everything from cotton to leather, in everything from rolls to scraps. It makes finding a way to organize it even harder, in my opinion.
Another big issue is the table. It’s a great standing height but it has a weird curve in the one side and no storage underneath. I made do with it but I knew I needed something better. And I had just the partner to help me out…
We took a trip to the absolutely gigantic IKEA in Burbank and picked up two each of two different size Kallax shelves (the 2×2 and the 2×4). Then to Home Depot for a couple sheets of plywood, one with a melamine top, five table legs, aluminum for the sides and bolts to hold it together.
{This is when I feel especially grateful: I have a space that’s larger than anything I could’ve hoped for; I have a guy who cares about me enough that he’s willing to drive all over Los Angeles for me to buy stuff then haul it back in his truck and help me build the damn thing. Life is good.}
While Hawke ran some work errands, I broke down the old table, moved everything to the side and built the bookcases in the middle of the room. Then he came over and cut the plywood sheets down to size. The bottom is the same size as the bookcases. The top is 1 1/2″ wider on three sides and 12″ longer on the fourth side.
The leftover from the plywood was the perfect size for a ironing board and I’d lost space for the standalone. I used Leah Day’s tutorial, using two layers of batting covered with canvas. In a weird coincidence, the fabric is actually from IKEA, as well, it’s just been sitting in my stash for about five years.
I started getting stuff put away ASAP but there’s been a bit of shuffling and as I use it I’m sure it will move around even more until everything finds its happy place.
My machines (Bernina 350PE and Pfaff 130 Industrial) live under the window. My serger (Brother) lives on the table for easy access, with plenty of room for cutting mats, ironing board and my new Sizzix die cutter.
My books and magazines and precuts make for a pleasant view when you enter my studio and are way easier to access in these shelves. I don’t love the power cord coming down from above but it totally works, so I can’t really complain.
I finally bought a spool holder for all my thread, which made me realize that I have more than 120 spools of thread, in addition to the dozen cones I have, as well. I might have a problem with collecting thread.
In lieu of buying fancy cupboards, I just hung up a white sheet to cover the piles of random denim, minky, knits and linen on the shelves. Visually it helps a lot to not see the mess. Or at least so much mess.
I’m not finished but it was such a dramatic improvement I couldn’t help but do a little happy cry. I think is going to help my productivity, my happiness, my concentration and creativity by adding the table and storage. I’ll check back in with you later, but I’m pretty optimistic about it.
Follow along with the rest of the Studio Spring Cleaning crew:
I first heard about this book a year ago when I was chatting with John Kubiniec at Quilt Market and he mentioned he was working on a book devoted to the Drunkard’s Path block. Drunkard’s Path?! That’s one of my top five! I love love love this block and its million different combos. I pretty quickly begged him to let me get a sneak peek at the book and he agreed. Months and months down the road, the book was finished and I got a copy to review.
John’s “A New Spin on the Drunkard’s Path” was just released from C&T Publishing and is available directly from John (and he’ll sign it!), as well through many fine shops (and I’d encourage to seek it out at an independent quilt shop or book seller near you).
It wasn’t until I’d started reading it that I realized I’d met John’s work long before I met him. Like many quilters, I’m always tearing patterns and inspiration from magazines. Back in 2013 I found a beautiful red and white Drunkard’s Path in McCall’s Quilting magazine. I tore out the picture and put it into my files, ready to inspire me again when I had the chance. Come to find out, that was John’s quilt design and it was his first foray into the Drunkard’s Path block! That block layout is the one he used on the cover and so, of course, it was the one I had to use, as well.
I started with a half-yard bundle of Indie from Art Gallery Fabrics. I’ve been holding onto it for three years, as well, so I figured it was a great fit. I kicked out a couple of the fabrics in the bundle, choosing eight to work with, then combined it with Kona White.
His advice for manageable bits is wonderful and exactly the reassurance you need to keep yourself from feeling overwhelmed. You can do this, really, but take your time and John’s advice to make it a fun, productive process. As he suggests, I simply did the cutting on the first day. And then let it sit there in a pretty little pile for longer than I should have, but hey, at least it was a lovely addition to my view.
You’ll notice that I cut out my triangles. I did much of the construction slightly differently than John, but only because I’m very comfortable sewing curves the way I sew them and prefer trimming before I sew.
His tips on sewing the curves are great and I totally recommend them. You’ll learn ways that make it easier for you along the way. John suggests you pin at the ends and in the middle. I don’t pin at all, but you can see that I don’t always get it right in the pic to the left. I have one block that is perfect and another that ended being 3/16″ off. John’s method But in the end, I had a whole big pile of Drunkard’s Path blocks to play with.
I really like how they play together and create these little bow ties in there.
I love how the fabrics play together and am so glad I held on to the Indie bundle for all this time.The view from above. Right now it measures 48″ x 42″ (approx) and is great crib size quilt. I’m pretty sure I’m going to keep growing it though. 🙂 It’s fun to compare this quilt to what John originally designed in the red and white combo and what he shows in “A New Spin on Drunkard’s Path” with the black background. And honestly, this is one of my favorite aspects of quilting–the never-ending ways you can put together the same thing. Same block, same construction, totally different look. It keeps quilting fresh and fun and intriguing to me.
In his book, John shows several variation of each quilt to give you some ideas, spark a little creativity in the reader, which is a much-loved feature for me. But I think the winning aspect of the book is his attention to detail and accuracy. It’s clear that John is a teacher who wants his students to succeed. He walks the reader through each step with clear photos, tackling the curves and adding interesting details to the block.
If you’re nervous about sewing curves and need someone to hold your hand through it, John is there for you, explaining and reassuring you at each step. He shows you just how easy it really can be and then opens a whole new world of quilts for you with 12 beautiful variations of the Drunkard’s Path.
I’ll be giving away a copy of the book to inspire you to get started on your own curvy quilt. Just leave a comment here and tell me what has stopped you from taking on the Drunkard’s Path or if you have, what you love about it. We’ll pick a winner on October 9.
Congratulations to Lori Morton for winning her very own copy of John’s “A New Spin on Drunkard’s Path” book!
I’m excited to be the one to kick off the Handmade Holidays over at Sew,Mama,Sew! If you’re new to the series, you’re gonna love this. Every year Handmade Holidays runs through November, each day offering up tutorials gathered by a variety of designers, authors, and bloggers.
My focus was Gifts for Crafty People and I included tutorials for a pincushion, apron, clock, lanyard, crochet hook case and my own needle book. Plus there are a couple of my favorite recipes (mmm!) and some printables. Continue reading “Handmade Holidays Time!”
“It’s a waste of time. I’ll just iron it when I’m done.”
The first time I heard someone say this I audibly gasped, horrified that anyone would put off pressing. But the mm-hmming of those around me made me realize that it was a common sentiment.
As a long-time garment sewist, the need to press as-you-go has been drilled into me, but many quilters and new garment sewists don’t realize the difference it can make in the final outcome.
Luckily for me I stumbled onto them back at Sew Expo this spring and bought the Butterick 6168 right away. I made it up using Sara’s new Fantasia voile, which was gorgeous, but I messed up the front somehow and was left with quite the plunging neckline (photos and dress are NSFW!).
Last month I participated in Jennifer Sampou‘s Black and White Collection blog hop via the work blog, but I’m so happy about how it turned out, I just wanted to share it here as well! We got to choose our own pattern (or make up our own) for each stop along the way. I’ve learned to really love this Winding Ways block and wanted to use that. I set to work with a pencil and a Winding Ways blank template.
One of the things that I really love about this pattern is all the intersecting circles and how they play with each other depending on where you put color and where you don’t.
I can sit and color in those blocks for hours, erasing and re-arranging until everyone has locked the doors and gone home.
I can’t say I figured this out on my own, either. It was thanks to doing work with Luke Haynes on this Moda quilt that I learned just how entertaining this traditional block can be when fiddled with.
sorry for the iPhone shot, but it’s all I can find 🙁
I played with it until I settled on a design, got the fabric and set to work on cutting out the pieces (thank you, Accuquilt) and piecing, piecing, piecing. I did a lot of these blocks one at a time, which I tend not to do (I love chain piecing more than almost anything), but since it was a pretty finicky pattern and I was making it up on the fly, I needed to get it right.
If you look close enough, though, you’ll notice that I didn’t get it quite right. Let’s call that a “design choice” or a “only God makes perfect things” decision.
Yeah, that’s it.
The quilt was featured on the third day of the hop and I was super happy to see it get so many likes on Instagram. I know, it sounds silly and superficial, but really…it’s hard putting your work out there to be judged. And I’ve seen more than a few designers ripped a new one over their designs and it is not pretty. Luckily this one was liked.
A lot. And people asked for a pattern. (What the what?!?)
So I asked my boss if we should do a pattern through work or if I should do it on my own.
She said they’d do it (which is great because their graphic designer is WAY better than I could ever be). I wrote up a few guidelines, figured out quantities and then “tested” it with paper pieces.
Then wham-bam, there was a pattern!
And you can get it for FREE from Fabric Depot: Supernova Quilt.
In March I’ll have a little quilt along for those who are interested in making your own version. I’m still working out the details and trying to figure a workable timeline for everyone, so if you have feedback on what you want/like/hate about quilt alongs, leave me a comment. I’d love your input!
It’s finally here, the book that Thomas told me he would someday write way back when we first met at Quilt Market. Houston in 2011, right, Thomas?
I’d already fallen for his first collection, Pear Tree, and its lovely muted colors (the same just-off hues that would sucker me into every TK collection). We’d talked online thanks to my work for FabShop News magazine and I was both awed and honored when he went out of his way to talk to me in the wide aisles of Market. He told me his ideas for a book and I knew this guy was different.
Spend five minutes talking to Thomas and you’ll be awed by his vast knowledge and ability to pull info, facts and connections seemingly out of thin air. I like to think the guy is a genius. He chalks it up to a lot of schooling. I’ll agree to something in the middle.
Thomas’ skill at drawing connections and thinking beyond the “Isn’t that pretty?” that infiltrates the fabric world continues to amaze and inspire me. And it is in that unique way that Modern Quilt Perspectives unfolds.
Essays. Quilt patterns. Sidebars of wisdom. It’s a remarkable book and I can’t recommend it enough.
In particular I want to share about the Excess quilt. No, I didn’t have anything to do with it (though I did make an ‘I’ for the Identity quilt!). It’s just one that symbolizes all that this book does.
Here, take a look:
Lovely, right? It is an incredibly long quilt (13 feet, in fact!) and when I was flipping through the book for the first time, it caught my eye with its size and the preponderance of reds and dashes of green and blue. It’s scrappy the way scrappy ought to be, I thought.
It wasn’t until I stopped to actually read the accompanying essay, that I understood its importance as a piece of art, an unspoken message.
And that’s something that Thomas never forgets or looks past. Quilts are art. They can be powerful, awe-inspiring, meditative and breathtaking. This quilt took my breath away.
In Excess, there are 1,600 of those little 2-1/2″ blocks. It’s not a random number, something picked out of the air or decided on when the quilt got to the right size. No, that number was chosen for a reason.
Every year, approximately 1,600 women and men are killed in acts of domestic violence in the United States, victimized by their partners and spouses. … Excess is a memorial to this overwhelming reality, a visualization of the forest of loss. Each of the 1,600 squares in the quilt represents a death, with each red or orange stripe a woman killed, and each blue or green one a man.
Now go look at that quilt again and meditate on those numbers, that issue.
This is what makes Modern Quilt Perspectives more than just a quilting book. There is substance and depth and meaning, so much meaning, to all of it. Thank you, Thomas, for reminding me (us?) of the import of it all.
. . . . . . . . . . . . .
I decided I would make the pattern myself (this is a quilting book after all), though not in the numbers that Excess originally calls for. Just a few dozen in my favorite greys. I haven’t decided how big I’ll make it, or quite what I’ll do with it when I have pieced it together. But I can tell you that the quilts in Modern Quilt Perspectives are not only powerful art, but that they are well-written patterns as well.
So get to it–go get the book, read it, learn from it and venture onward. I can promise you this: it will change the way you look at quilts and the messages they can send.
Thank you, Thomas, for an amazing book, jaw-dropping quilts and for being you.