How to glue baste and machine stitch quilt binding

Truthfully, I always prefer a hand-sewn binding, but sometimes deadlines get the best of me and I have to take the faster route. I was able to finish four of the six quilt in the American Travels series by hand before I shipped them off to Accuquilt (they’ll be on display through March and April!), there were two more than had to get stitched on by machines. I thought I’d share my method with you since it works pretty well for being second best.

Continue reading “How to glue baste and machine stitch quilt binding”

Dear Jane: My Favorite EPP Tools and Tips

I’m still plugging along, albeit very slowly, on my Dear Jane and already I’m a whole month behind. I’m trying not to panic, but I may have set up a little morning stitching time if I ever plan to keep up. Sheesh.

Work life has been busy lately with Road to California and this past week’s trip to Sewposium in Orlando. If I were thinking more clearly, I would have brought a couple of the Dear Jane blocks on the plane with me. Five-plus hours each direction is plenty of time to get some sewing done, but instead I read the entirety of A Handmaid’s Tale by Margaret Atwood. Then I got bronchitis and still didn’t sew anything.

But I digress. Let’s talk English Paper Piecing (EPP).

This sewing/quilt-making technique has been around for  at least a couple hundred years, which seems both crazy and wonderful. I love the long history of textile arts, somehow connecting a thread between generations and continents, preserving a craft, an art for the future as well.  Luckily for us, these days, we have the high quality tools and this lovely thing called the Internet to make it a bit easier than the ladies had it back in the 1800s.

If you’re just getting started with EPP, or struggling a bit with it, let me tell you what I use and do to make it a fun and not-so-laborious venture.

•   Kai 4″ Scissors  

Small and sharp, these 4 1/2″ serrated scissors come with a cover that keeps them safe and easy to stash in the zipper pouch. Perfect for trimming pieces and clipping threads.

•   Clover Wonder Mini Clips  

I use a Wonder Clip on on the opposite end of the seam I’m stitching to keep the washi tape in place.

•   Washi Tape

Since I sew my pieces flat and washi tape keeps the seam aligned and even without trying to use pins.

•   Bottom Line thread  

Honestly, this is my favorite EPP thread by far. There are a few lightweight threads designed specifically for the task, but the Superior Threads version is super strong and never snaps. You can get it on pre-wound bobbins or spools.

•   John James needles

I like this brand, but as proven by the needle testing we did for Sew,Mama,Sew, it really is personal preference. I like a slightly longer needle without a sharp butt (I’m prone to stabbing it into my finger).

As I mentioned, I prefer to sew my pieces together when they are flat. I can get a tighter stitch that is not seen from the front. I used to simply try to clip it together, but they would slide apart. I started using blue tape because it doesn’t stick to the fabric. I switched to washi tape for the cuteness factor only.

Here’s a pictorial rundown of how I sew my pieces:

First, I pin the pattern piece to whichever fabric it needs to be made with. I’ve coded these as BG=background and G= grey.

I cut the fabric pieces as I go, trimming there to a heavy 1/4″ seam allowance. They are rarely even and often not-quite-straight, but in the end it doesn’t matter at all.

Using an obvious-color thread, I stitch right through the Dear Jane paper template. For my hexagons, apple cores, etc. I do not stitch through the paper, but because this project will live for a long time in a box and there are a lot of triangles and squares, I want to make there that papers don’t shift as I sew and then store them.

I get each square going by sewing just two pieces at a time. As I get pairs together, I’ll start putting the pairs together. No matter the order of assembly, all the seams start this way.

From the right side, I tape the pieces together, making sure the edges are even and correctly aligned.  Then I clip the end that I’ll sew last o that it all stays in place as I make my way across the seam. One of the issues I have when I don’t do this is that the pieces shift ever so slightly and the end won’t match.

I start by knotting the thread and securing it away from the corner/edge. Then I stab the needle through the very corner of each piece.

Working my way across the edge, I take tiny stitches, then tug them tight. It might look a little crazy-making, but once you get a rhythm going they piece together pretty quickly.  In the end, the stitches look fine from the back and are invisible from the right side.


I toss these back into my little zip pouch and keep putting them together, two pieces at a time until the block is finished. Now that life is a little more on-track, I’m hoping to get a few of these done this week. I’ve already got the templates for Rows B and C waiting for me, so I have to try to catch up a bit!

Are you doing the Dear Jane, too? How are your blocks coming along? Check out everyone else’s blocks on Instagram with a quick search of @dearjanegoesepp.

Just keep stitching!

Oh Dear Jane!

Dear Jane,

I fell in love with your crazy, beautiful quilt when I first saw it two decades ago ago. I bought the Dear Jane book (by Brenda Papadakis) a few years later, dreaming of my own version. Then I started collecting fabrics for it, especially lots of grey fabrics because I’d decided that is what I wanted it made with. And there it stopped. Well, except for the fabric collecting. You know how that is; any excuse to buy fabric and I’ll do it. But the idea of actually making the quilt was put on pause.

So now six, seven years later, this lovely little company called Paper Pieces decides to release a paper pieced version of your quilt using  Brenda’s book. The Dear Jane 18-Month Quilt Along should be a title that would keep me away from doing it, but I’ve been so enamored by that quilt I just couldn’t help myself. You know how I am, Jane; I signed up right away.

I got the first set of paper pieces for Row A at the end of December, but didn’t dare open it up and look for a few more days. And honestly when I opened it and poured all those itty bitty pieces out, I nearly cried. But then I remember you, doing this all without your Kai scissors or special paper piecing templates or good needle and thread or probably even decent lighting, and I pulled myself up from a fetal position on the floor and decided to give it a go. I’m only two blocks in (just 223 to go!), but I’m really going to try, Jane. It will be my magnum opus. My quilt to keep.

Row B showed up two days ago and I’m not even looking at it yet. One row at a time, right? It may end up being a three-year project for me, but so be it. I will finish it or die trying.

Thank you, dear Jane, for your beautiful work and the inspiration to venture into an overwhelmingly large project that will eat up my evening for years to come. I hope to make you proud in the end.

All the best,

sig17


P.S. If you want to follow along with my very slow process, you can follow me on Instagram: @teresacoates. Search for #dearjanegoesepp for others’ beautiful work, too.

Distracted

alturas-front-cover_low-resThe first time I saw Carolyn’s Alturas pattern I think I actually squealed out loud. You know that embarrassing, “Oh! I looooove it!” exclamation that never fails to leave me looking around, hoping against hope that I’m totally alone. But it was worth it. Alturas is beautiful and simple in this vintage way that I absolutely do love. [Check out her blog post to see the varied iterations of Alturas for more inspiration.]

I made one a while back; quilted it up as a mug rug and gave it away in some swap or another. I don’t even remember what fabric I used, but I knew I really, really liked the pattern.

So a couple nights ago, when I should have been packing for the upcoming move but would rather do anything else, I decided to break open the London Calling charm pack and make one up.

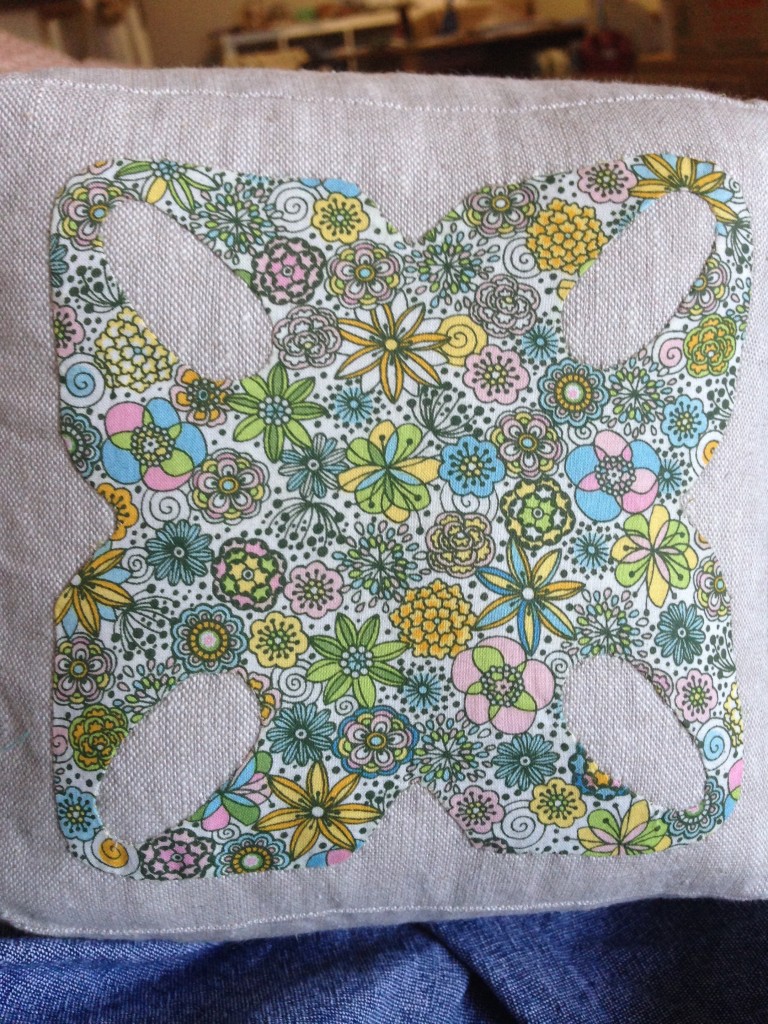
London Calling is a lovely cotton lawn collection, a tight weave but kinda floppy. I starched the bejeezus out of the charm square before cutting it (and yes! the pattern is perfect for charm squares!) and started out by basting it onto the Essex Yarn-Dyed Linen, all the way around, then clipping the curves and doing some relaxing needle turn appliqué.

IMG_8203

I watched a couple of episodes of Dexter and it was done. Just like that.

IMG_8207

My original plan had been to make a pincushion out of it, but once I got the box made and stuffed I realized it was just too big for a pincushion. So instead I have a tiny pillow.

IMG_8208

And the impetus to make an entire Alturas quilt, one block at a time.

Distracted

alturas-front-cover_low-res

The first time I saw Carolyn’s Alturas pattern I think I actually squealed out loud. You know that embarrassing, “Oh! I looooove it!” exclamation that never fails to leave me looking around, hoping against hope that I’m totally alone. But it was worth it. Alturas is beautiful and simple in this vintage way that I absolutely do love. [Check out her blog post to see the varied iterations of Alturas for more inspiration.]

I made one a while back; quilted it up as a mug rug and gave it away in some swap or another. I don’t even remember what fabric I used, but I knew I really, really liked the pattern.

So a couple nights ago, when I should have been packing for the upcoming move but would rather do anything else, I decided to break open the London Calling charm pack and make one up.

London Calling is a lovely cotton lawn collection, a tight weave but kinda floppy. I starched the bejeezus out of the charm square before cutting it (and yes! the pattern is perfect for charm squares!) and started out by basting it onto the Essex Yarn-Dyed Linen, all the way around, then clipping the curves and doing some relaxing needle turn appliqué.

IMG_8203

I watched a couple of episodes of Dexter and it was done. Just like that.

IMG_8207

My original plan had been to make a pincushion out of it, but once I got the box made and stuffed I realized it was just too big for a pincushion. So instead I have a tiny pillow.

IMG_8208

And the impetus to make an entire Alturas quilt, one block at a time.

Product Review: Clover Clamshell

I got the Clover Clam Shell Accessories Case months ago and its just hung out in my sewing box, waiting for the perfect time.

I’d thought the perfect time was a week or so ago when I started sewing together hexies in the new “Simply Color” fabric by Vanessa Christenson. Well, despite all that work, they weren’t quite large enough to cover the plastic inserts, so I chucked that idea and started over with scraps of fabric.  I used the leftovers from the coasters I made a while back.

The Clam Shell pattern comes with instructions and the plastic inserts. There are 9 pieces for the large pattern (6 for the small and medium). You’ll need scraps of fabric, batting and lots of thread. 20121013-203140.jpg

You cut out each piece a half inch larger than the plastic insert, baste around the edges, then draw up the threads, so that it fits tightly against the plastic. To keep it in place, you have to stitch back and forth across the back. This takes a lot of thread. It also works pretty darn well.  Make sure to tack down the ends really well and as smoothly as possible.

20121013-203200.jpg

You’ll end up with three of these inside pieces, ready to go.

20121013-203225.jpg

You’ll do the same thing with outside pieces, except with a piece of batting behind the fabric. I basted then together with a long running stitch. They suggest glueing it to the plastic. I didn’t because 1) I didn’t know where any glue was and 2) I was too anxious to get sewing to stop and hunt it down. In retrospect, I’d recommend it, too. My method worked fine for two of them, but on one, the batting shifted a bit and caused some bumping issues on one end.

20121013-203234.jpg

Then stick them together, insides to outside. I used bulldog clips to hold them together, but you can use Wonder Clips or Getta Grip clips if you prefer.

20121013-203258.jpg

Then you are gonna hand-stitch that sucker down, all the way around. I used a small ladder stitch to keep it held tightly and hide the stitches.  [Please forgive the nails; I clearly need to spend more time polishing my nails and less time worried about tight stitching.]

20121013-203318.jpg

Sew, sew , sew and sooner or later, you’ll end up with this! It’s a cute little box that pops open (with my tag inside–squee!).

20121013-203333.jpg

20121013-203409.jpg

Overall, the kit is easy enough to put together, just takes time and some precision stitching. In the end, it’s an adorable little pouch-thing that you could put all sorts of things in. My daughter wants me to make some tiny ones that will look like dumplings. I think I might just have to try.

P.S. I think these would be super cute to put a small gift in. You know those odd-shaped gifts that are super hard to wrap? It’s the perfect holder for it. Then it’s two gifts in one!


Working on hexies

From Vanessa Christenson’s new “Simply Color” line from Moda. I have no idea what I’m doing with them yet. I just find them slightly addictive to make.

20120925-212404.jpg